
一、认识Vue3
1.相关信息
支持vue2.x大多特性
更好的支持typescript
………
2.性能提升
使用Proxy
重写虚拟DOM
………
3.新增特性
Composition API
响应性API
组件
………
二、创建Vue3项目
使用脚手架vue-cli
npm install -g @vue/cli
查看版本
vue –version
创建项目
vue create vue-demo
三、新特性学习
1.Composition API
1.1 Setup
所有的组合 API 函数都在此使用, 只在初始化时执行一次。
假设界面需要渲染一个变量count。
App.vue
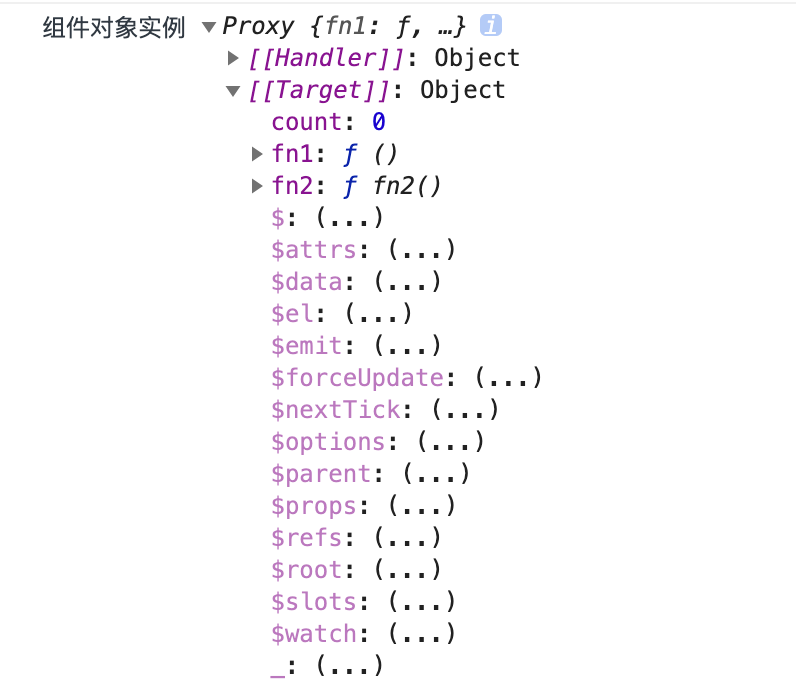
<h1>setup的简单使用,{{count}}</h1>1.函数一般返回一个对象,对象中的属性或方法。为模板提供数据, 也就是模板中可以直接使用此对象中的所有属性和方法。
2.setup返回对象中的方法会与 methods 中的方法合并成组件对象的方法。
App.vue
<template>

  <h1>setup返回值,{{count}}</h1>

</template>

<script lang="ts">

import { defineComponent } from 'vue';

export default defineComponent({

  name: 'App',

  setup(){

    let count = 0

    const fn2=()=>{

      console.log('setup fn2')

    }

    return {

      count,

      fn2

    }

  },

  mounted(){

    console.log('组件对象实例',this)

  },

  methods:{

    fn1(){

      console.log('methods fn1')

    }

  },

});

</script>
执行结果如下图:
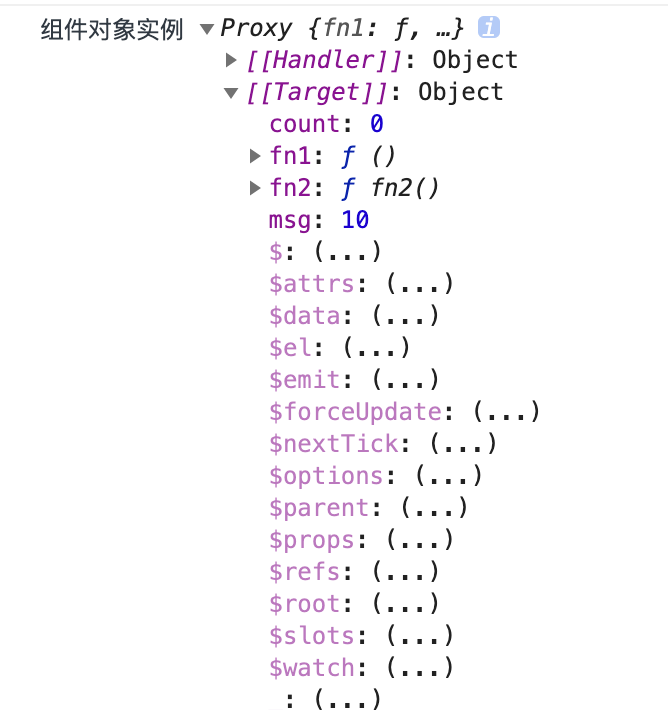
3.setup返回对象中的属性会与 data 函数返回对象的属性合并成为组件对象的属性。
App.vue
<template>

  <h1>setup返回值,{{count}}</h1>

</template>

<script lang="ts">

import { defineComponent } from 'vue';

export default defineComponent({

  name: 'App',

  setup(){

    let count = 0

    const fn2=()=>{

      console.log('setup fn2')

    }

    return {

      count,

      fn2

    }

  },

  data(){

    return {

      msg:10

    }

  },

  mounted(){

    console.log('组件对象实例',this)

  },

  methods:{

    fn1(){

      console.log('methods fn1')

    }

  },

});

</script>
执行结果如下图:
注意:
一般不要混合使用: methods 中可以访问 setup 提供的属性和方法, 但在 setup 方法中不能访问 data 和 methods(setup中无this)。
通过执行beforeCreate来判断setup的执行时间。
App.vue
<template>

  <h1>setup执行时间,{{msg}}</h1>

</template>

<script lang="ts">

import { defineComponent } from 'vue';

export default defineComponent({

  name: 'App',

  beforeCreate(){

    console.log('beforeCreate执行啦')

  },

  setup(){

    let msg = 'setup执行啦'

    console.log('setup执行啦')

    return {

      msg,

    }

  },

});

</script>
执行结果如下图:
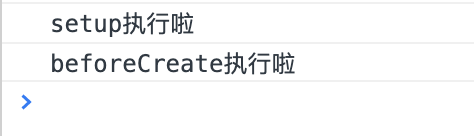
通过执行结果可以得出,setup在beforeCreate之前就执行了,并且只执行了一次,由此可以推断此时组件并未创建,组件实例对象this不能够使用。这意味着,除了 props 之外,你将无法访问组件中声明的任何属性——本地状态、计算属性或方法。
setup 选项应该是一个接受 props 和 context 的函数。
假设有一个子组件Child.vue,从App.vue向子组件传递数据。
App.vue
<template>

  <h1>setup参数:父组件</h1>

  <Child :count="count" msg="hello" @countAdd="countAdd"></Child>

</template>

<script lang="ts">

import { defineComponent } from 'vue';

import Child from './components/Child.vue'

export default defineComponent({

  name: 'App',

  components:{

    Child

  },

  setup(){

    let count = 0

    const countAdd=(value:number)=>{

      console.log('count+value',count+value)

    }

    return {

      count,

      countAdd

    }

  },

});

</script>
Child.vue
<template>

    <h1>子组件</h1>

    <button @click="emitCountAdd">点击+</button>

</template>

<script lang="ts">

import { defineComponent } from 'vue';

export default defineComponent({

    name:'Child',

    props:['count'],

    setup(props,context){

        console.log('child props',props)

        console.log(props.count)

        console.log('child context',context)

        //context是一个对象,包含attrs,slots,emit

        console.log('context attrs',context.attrs)

        // 插槽 (非响应式对象)

        console.log('context slots',context.slots)

        // 触发事件 (方法)

        console.log('context emit',context.emit)

        //事件点击

        const emitCountAdd=()=>{

            context.emit('countAdd',3)

        }

        return {

            emitCountAdd

        }
  },

})

</script>
Props: 是有一个对象,包含父组件向子组件传递的数据,并且是在子组件中使用props接受数据。setup函数中的props是响应式的,不能使用 ES6 解构,因为它会消除 prop 的响应性。如果需要解构 prop,可以通过使用 setup 函数中的 toRefs 来完成此操作。
Context: 是一个普通的 JavaScript 对象,也就是说,它不是响应式的,这意味着你可以安全地对使用 ES6 解构。它暴露三个组件的 property,分别是attrs(获取当前组件的所有的标签属性对象,该属性是props中没有声明接收的所有的属性对象)、slot(插槽)、emit(触发事件)。
1.2 Computed
与vue2中的计算属性功能一致。
如果计算属性的回调函数中只传入一个参数,表示的是get。
在后续小案例代码中看见ref,reactive等响应式应用,请访问 响应性API 进行了解。
App.vue
<template>
<h1>计算属性:</h1>
<h3>姓名:{{fullname}}</h3>
姓氏:<input type="text" v-model="firstname">
<br/>
名字:<input type="text" v-model="lastname">
<br>
姓名:<input type="text" v-model="fullname">
</template>
<script lang="ts">
import { computed, reactive, ref } from 'vue'
export default {
setup() {
let firstname = ref('liao')
let lastname = ref('xin')
//如果计算属性的回调函数中只传入一个参数,表示的是get
// let fullname = computed(()=>{
// return firstname.value + '--' +lastname.value
// })
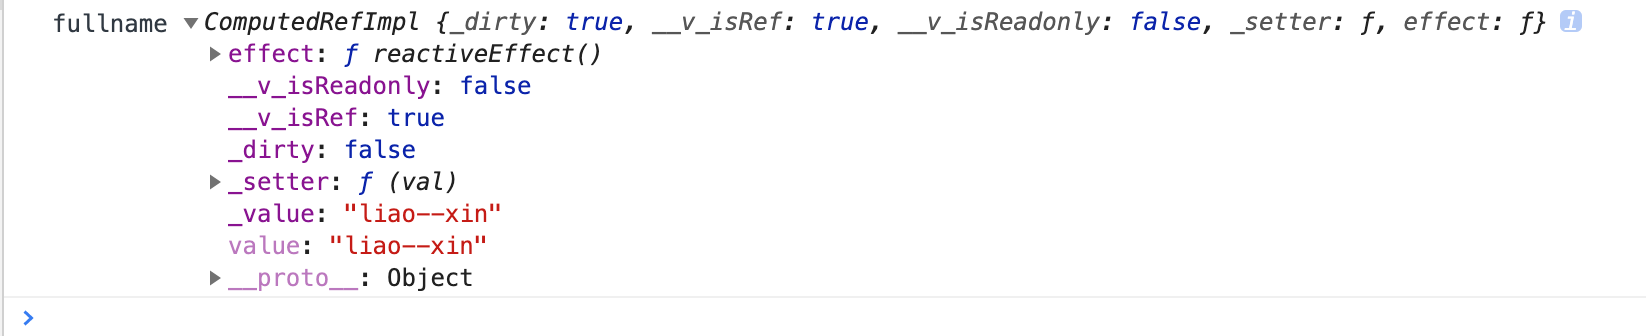
let fullname = computed({
get(){
return firstname.value + '--' +lastname.value
},
set(val:string){
firstname.value = val
}
})
console.log('fullname',fullname)
return {
firstname,
lastname,
fullname
}
}
}
</script>我们可以通过打印fullname查看是什么样的数据。
1.3 Watch
与在组件中利用watch选项设置监听器功能相同。监听指定的一个或多个响应式数据, 一旦数据变化, 就自动执行监听回调。
watch函数接受三个参数:
1.是想要监听的响应式应用或者getter函数
2.是触发执行的回调函数
3.是可选的配置选项
watch(object,callback,options)
假设有一个user响应式应用,监听此对象。
App.vue
<template>

  <h1>Watch:</h1>

  <h3>姓名:{{fullname}}</h3>

  姓氏:<input type="text" v-model="user.firstname">

  <br/>

  名字:<input type="text" v-model="user.lastname">

  <br>

  姓名:<input type="text" v-model="fullname">

</template>

<script lang="ts">

import { computed, reactive, ref, watch } from 'vue'

export default {

  setup() {
    let user = reactive({
      firstname:'liao',
      lastname:'xin'
    })
    let fullname = ref()
    watch(user,()=>{
      fullname.value = user.firstname + '--' + user.lastname
    },{
      immediate:true, //是否初始化立即执行一次, 默认是false
      deep: true // 是否进行深度监听, 默认是false
    })
    return {
      user,
      fullname
    }
  }
}

</script>
每当user被修改时,比如user.firstname = ‘xinxin’,监听将会触发并执行回调函数。
第三个参数是可选的配置选项,immediate属性表示是否初始化立即执行一次回调,默认初始不执行回调函数,deep表示是否进行深度监听。
如果immediate属性为false,界面就会如下图
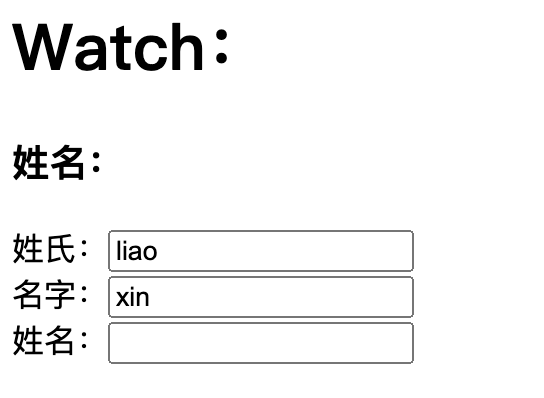
注意
如果watch监听的不是响应式数据,可以使用回调的写法
App.vue
<template>

  <h1>Watch:</h1>

  <h3>姓名:{{fullname}}</h3>

  姓氏:<input type="text" v-model="user.firstname">

  <br/>

  名字:<input type="text" v-model="user.lastname">

  <br>

  姓名:<input type="text" v-model="fullname">

</template>

<script lang="ts">

import { computed, reactive, ref, watch } from 'vue'

export default {

  setup() {

    let user = reactive({

      firstname:'liao',

      lastname:'xin'

    })

    let fullname = ref()

    watch(()=>user.firstname,()=>{

      console.log('----')

    })

    return {

      user,

      fullname

    }

  }

}

</script>
1.4 watchEffect
接收一个回调函数。
watchEffect(callback)监听user,fullname变量。
<template>

  <h1>计算属性:</h1>

  <h3>姓名:{{fullname}}</h3>

  姓氏:<input type="text" v-model="user.firstname">

  <br/>

  名字:<input type="text" v-model="user.lastname">

  <br>

  姓名:<input type="text" v-model="fullname">

</template>

<script lang="ts">

import { computed, reactive, ref, watch, watchEffect } from 'vue'

export default {

  setup() {

    let fullname = ref()

    let user = reactive({

      firstname:'liao',

      lastname:'xin'

    })

    watchEffect(()=>{

      fullname.value = user.firstname + '--' + user.lastname

    })

    return {

      user,

      fullname

    }

  }

}

</script>
从如下执行结果中可以发现,watchEffect不用直接指定要监听的数据, 回调函数中使用的哪些响应式数据就监听哪些响应式数据,当这些数据发生更新时就会触发执行回调函数。
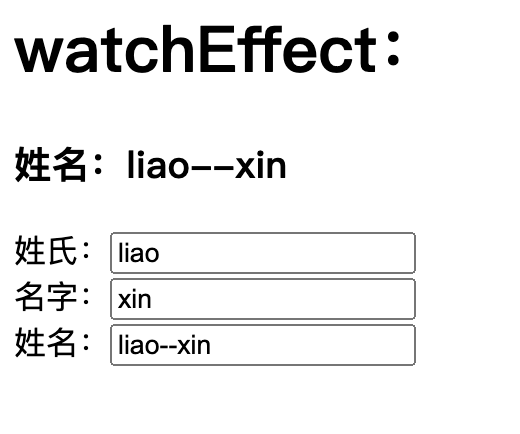
在查看执行界面时可以发现,在组件初始化的时候就会执行一次回调函数用以收集依赖,而后收集到的依赖发生变化,这个回调函数会再次执行。
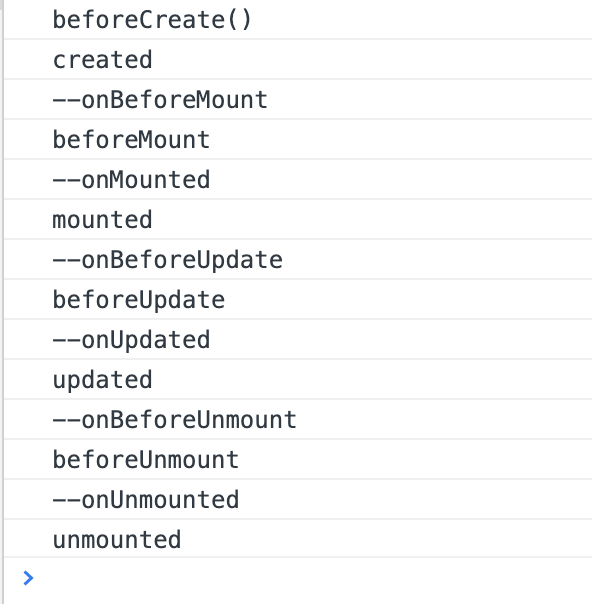
1.5 生命周期
对比选项式API,组合式API使用setup进行代替beforeCreate以及created。
组合式API在使用时我们都需要使用import进行引入。
| 选项式 API | Hook inside setup |
|---|---|
| beforeCreate | Not needed* |
| created | Not needed* |
| beforeMount | onBeforeMount |
| mounted | onMounted |
| beforeUpdate | onBeforeUpdate |
| updated | onUpdated |
| beforeUnmount | onBeforeUnmount |
| unmounted | onUnmounted |
| errorCaptured | onErrorCaptured |
| renderTracked | onRenderTracked |
| renderTriggered | onRenderTriggered |
假设有一个App父组件和一个Child子组件,通过点击按钮对Child组件更新变量值以及卸载组件来观察Child组件的生命周期。
App.vue
<template>

  <h1>App父组件</h1>

  <button @click="isShow = !isShow">切换</button>

  <hr />

  <Child v-if="isShow" />

</template>

<script lang="ts">

import Child from './components/Child.vue'

export default {

  data() {

    return {

      isShow: true

    }

  },

  components: {

    Child

  }

}

</script>
Child.vue
<template>
<div class="about">
<h1>Child子组件</h1>
<h3>message:{{msg}}</h3>
<div>姓名:{{obj.name}}-----年龄:{{obj.age}}</div>
<hr />
<button @click="update">更新</button>
</div>
</template>
<script lang="ts">
import { ref, onMounted, onUpdated, onUnmounted, onBeforeMount, onBeforeUpdate, onBeforeUnmount, onRenderTracked, onRenderTriggered, reactive } from 'vue'
export default {
beforeCreate() {
console.log('beforeCreate()')
},
created() {
console.log('created')
},
beforeMount() {
console.log('beforeMount')
},
mounted() {
console.log('mounted')
},
beforeUpdate() {
console.log('beforeUpdate')
},
updated() {
console.log('updated')
},
beforeUnmount() {
console.log('beforeUnmount')
},
unmounted() {
console.log('unmounted')
},
setup() {
let msg = ref('hello world')
let obj = reactive(
{
name:'liao',
age:18
}
)
//数据更新
const update = () => {
msg.value += '--'
obj.name += 'xin'
}
onBeforeMount(() => {
console.log('--onBeforeMount')
})
onMounted(() => {
console.log('--onMounted')
})
onBeforeUpdate(() => {
console.log('--onBeforeUpdate')
})
onUpdated(() => {
console.log('--onUpdated')
})
onBeforeUnmount(() => {
console.log('--onBeforeUnmount')
})
onUnmounted(() => {
console.log('--onUnmounted')
})
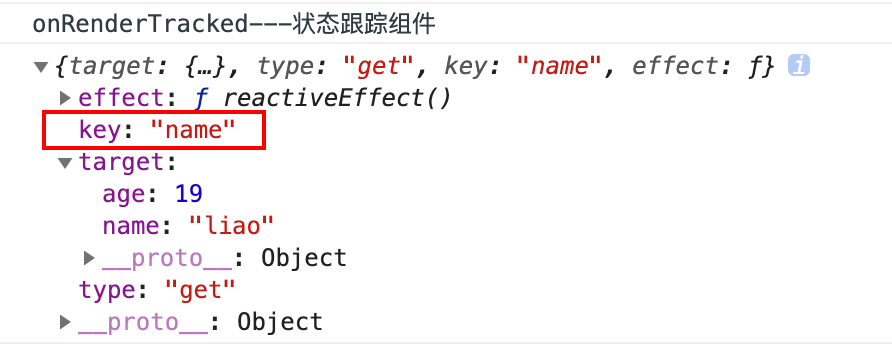
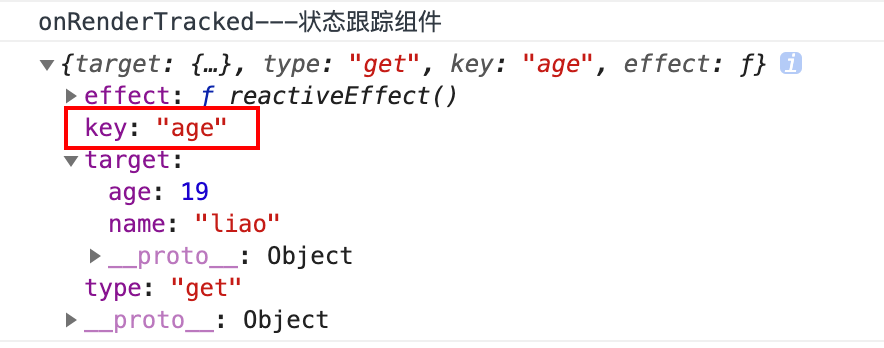
onRenderTracked((event) => {
console.log("onRenderTracked---状态跟踪组件");
console.log(event);
})
onRenderTriggered((event) => {
console.log("onRenderTriggered---状态触发组件");
console.log(event);
})
return {
msg,
obj,
update
}
}
}
</script>通过打印每个生命周期的变化,可以发现组合式API会比选项式API更快。
接下来讲解一下onRenderTracked和onRenderTriggered的使用。
onRenderTracked 字面意思状态跟踪,会跟踪页面上所有响应式变量和方法的状态。只要页面有更新的情况,它就会跟踪,然后生成一个event对象,我们通过event对象来查找程序的问题所在。
这里跟踪的是对象中的name。
这里跟踪的是对象中的age。
onRenderTriggered 字面意思状态触发,它不会跟踪每一个值,而是给你变化值的信息,并且新值和旧值都会给你明确的展示出来。然后生成一个event对象,我们通过event对象来调试程序。
这里触发的是msg的值。

这里触发的是对象中的name。

当这些钩子函数能够合理并且正确地使用我们可以快速的解决问题。
1.6 自定义Hook
使用 Vue3 的组合 API 封装的可复用的功能函数,功能有点类似于Vue2.x中的mixin。
使用自定义Hook函数让我们可以很清楚复用功能代码的来源, 更清楚易懂,并且代码更易维护。
假设有一个需求,需要在组件加载后在页面显示鼠标点击的坐标。常规操作如下代码。
App.vue
<template>

  <div class="app-home">

    <h1>自定义Hook函数</h1>

    <h4>坐标x:{{x}}</h4>

    <h4>坐标y:{{y}}</h4>

  </div>

</template>

<script lang="ts">

import { defineComponent, onBeforeUnmount, onMounted, ref } from "vue";

export default defineComponent({

  setup(){

    const x = ref(0)

    const y = ref(0)

    //点击事件回调函数

    const handleClick = (event:MouseEvent)=>{

      x.value = event.pageX

      y.value = event.pageY

    }

    //组件加载后

    onMounted(()=>{

      window.addEventListener('click',handleClick)

    })

    //组件卸载前

    onBeforeUnmount(()=>{

      window.removeEventListener('click',handleClick)

    })

    return {

      x,

      y

    }

  }

})

</script>
执行结果如下图:

如果在很多页面都有这样的功能,那么上述代码就没有复用的效果,该如何实现呢?自定义Hook函数。
在src/hooks文件夹下新建文件useMouseClick.ts。文件名通常以use开头,将可复用的代码都转入此文件中。
useMouseClick.ts
import { onBeforeUnmount, onMounted, ref } from "vue";

export default function(){

    const x = ref(0)

    const y = ref(0)

    //点击事件回调函数

    const handleClick = (event:MouseEvent)=>{

      x.value = event.pageX

      y.value = event.pageY

    }

    //组件加载后

    onMounted(()=>{

      window.addEventListener('click',handleClick)

    })

    //组件卸载前

    onBeforeUnmount(()=>{

      window.removeEventListener('click',handleClick)

    })

    return {

        x,

        y

    }

}
然后在App.vue中引入定义的useMouseClick函数。
App.vue
<template>

  <div class="app-home">

    <h1>自定义Hook函数</h1>

    <h4>坐标x:{{x}}</h4>

    <h4>坐标y:{{y}}</h4>

  </div>

</template>

<script lang="ts">

import { defineComponent } from "vue";

import useMouseClick from './hooks/useMouseClick'

export default defineComponent({

  setup(){

    let {x,y} = useMouseClick()

    return {

      x,

      y

    }

  }

})

</script>
执行结果与上图相同。
1.7 Provide / Inject
provide 和 inject 启用依赖注入。只有在使用当前活动实例的 setup 期间才能调用这两者。
Provide,接收两个参数,一个是property的name,一个是property的value
//需要引入provide

import { provide } from "vue";

provide(name,value)
Inject,接收两个参数,一个是 inject 的 property 的名称(name),一个是默认值(可选)
//引入inject

import { inject } from 'vue'

inject(name,initValue)可以使用provide 和 inject进行跨层级组件的通信。
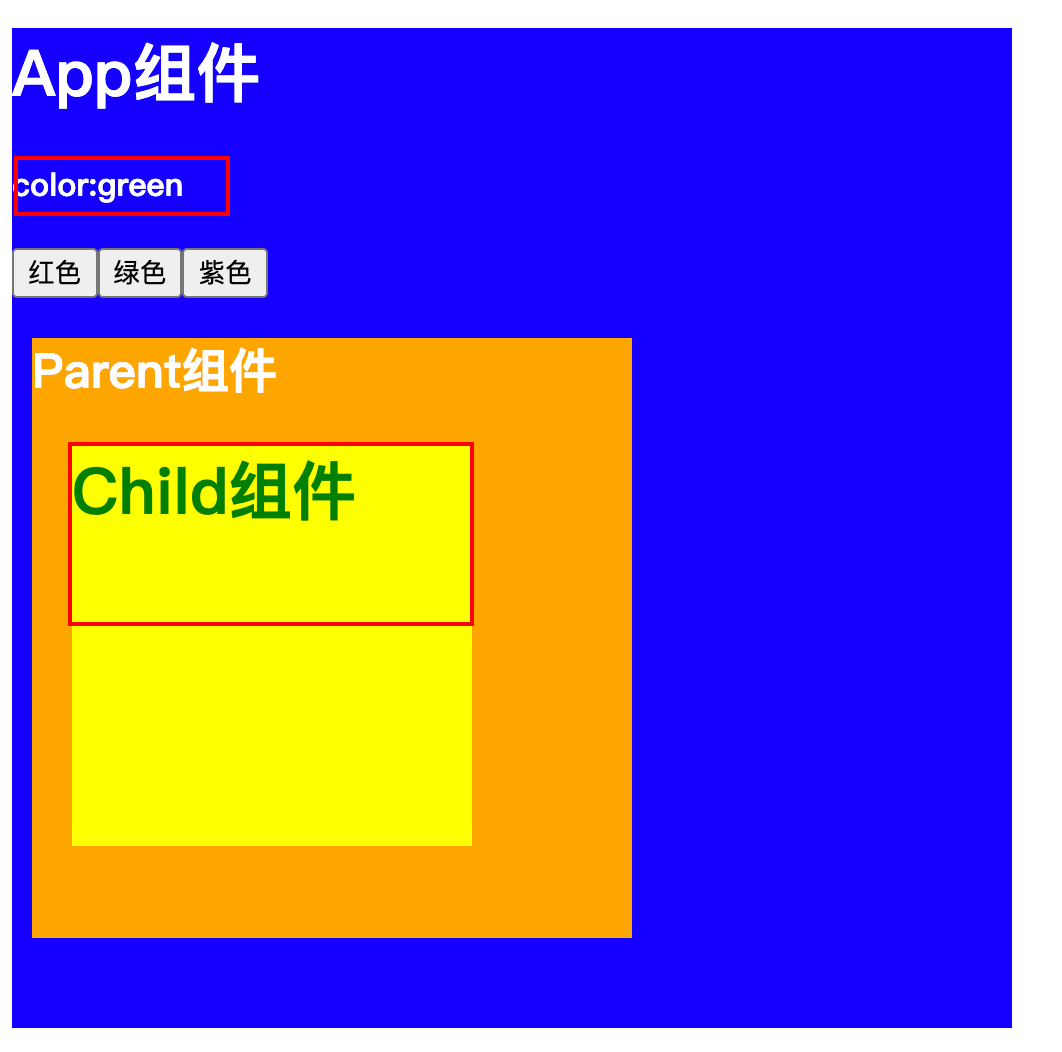
假设应用有三个组件,三者关系为App > Parent > Child,App.vue通过provide将数据传递给Child.vue,Child.vue通过inject将数据inject注入。点击App.vue组件的按钮,修改color数据,观察Child.vue组件的文本颜色变化。
App.vue
<template>

  <div class="app-home">

    <h1>App组件</h1>

    <h4>color:{{color}}</h4>

    <button @click="color = 'red'">红色</button>

    <button @click="color = 'green'">绿色</button>

    <button @click="color = 'purple'">紫色</button>

    <Parent/>

  </div>

</template>

<script lang="ts">

import { defineComponent, provide, ref } from "vue";

import Parent from './components/Parent.vue'

export default defineComponent({

  components:{

    Parent,

  },

  setup(){

  let color = ref('red')

  provide('color',color)

    return {

      color

    }

  }

})

</script>

<style scoped>

.app-home {

  width: 500px;

  height: 500px;

  background-color: blue;

  color: #fff;

}

</style>
Parent.vue
<template>

    <div class="parent">

        <h2>Parent组件</h2>

        <Child/>

    </div>

</template>

<script>

import { defineComponent } from 'vue'

import Child from './Child.vue'

export default defineComponent({

    components:{

        Child,

    },

    setup () {

        return {

        }

    }

})

</script>

<style scoped>

.parent {

    width: 300px;

    height: 300px;

    background-color: orange;

    margin: 10px;

}

</style>
Child.vue
<template>

  <div class="child">

    <h1 :style="{color}">Child组件</h1>

  </div>

</template>

<script lang="ts">

import { defineComponent, inject } from 'vue'

export default defineComponent({

  setup() {

  //注入

    let color = inject('color')

    return {

      color

    }

  }

})

</script>

<style scoped>

.child {

  width: 200px;

  height: 200px;

  background-color: yellow;

  margin: 20px;

}

</style>
执行结果如下图:
2 响应性API
2.1 ref
定义一个响应式数据。创建一个包含响应式数据的引用(reference)对象。
假设界面有一个变量count,通过点击按钮,使得count值修改,视图更新。
App.vue
<template>

  <h1>ref的使用:{{count}}</h1>

  <button @click="countAdd">点击+</button>

</template>

<script lang="ts">

import { defineComponent } from 'vue';

export default defineComponent({

  name: 'App',

  setup(){

    let count = 0

    const countAdd=()=>{

      console.log('count:',++count)

    }

    return {

      count,

      countAdd

    }

  },

});

</script>
如果直接通过如下代码进行修改数据,点击按钮,执行结果如下图:
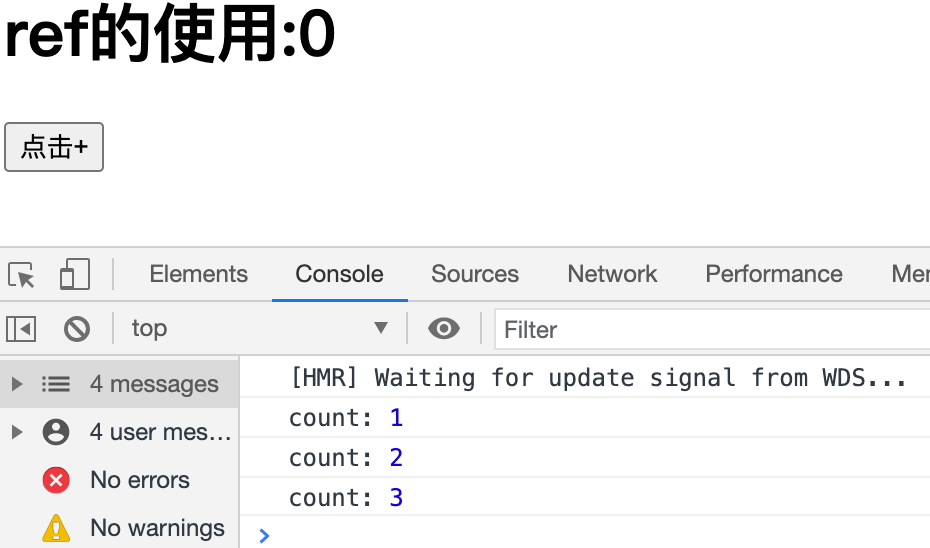
会发现,视图没有进行更新,那么如何解决呢?使用ref。
App.vue
<template>

  <h1>ref的使用:{{count}}</h1>

  <button @click="countAdd">点击+</button>

</template>

<script lang="ts">

import { defineComponent, ref } from 'vue';

export default defineComponent({

  name: 'App',

  setup(){

    let count = ref(0)

    console.log('count ref',count)

    const countAdd=()=>{

      console.log('count:',++count.value)

    }

    return {

      count,

      countAdd

    }

  },

});

</script>
再次点击按钮,会发现,视图更新了!!!我们可以打印count进行查看他的类型。
ref有另外的一个作用,利用 ref 函数获取组件中的标签元素。
假设有一个需求,在页面加载后,页面中的文本框自动获取焦点。
App.vue
<template>

  <h1>App组件</h1>

  <input type="text" ref="inputRef">

</template>

<script lang="ts">

import { defineComponent, onMounted, ref } from "@vue/runtime-core";

export default defineComponent({

  setup(){

    let inputRef = ref<HTMLElement | null>(null)

    console.log(ref)

    onMounted(()=>{

      if(inputRef.value){

        inputRef.value.focus()

      }

    })

    return {

      inputRef

    }

  }

})

</script>
注意
ref 接受参数,并将其包裹在一个带有 value property 的对象中返回,然后可以使用该 property 访问或更改响应式变量的值。
在模板中操作数据时,不需要value 属性。
2.2 reactive
定义多个数据的响应式。
接收一个普通对象然后返回该普通对象的响应式代理器对象。响应式转换是“深层的”:会影响对象内部所有嵌套的属性。内部基于 ES6 的 Proxy 实现,通过代理对象操作源对象内部数据都是响应式的。
假设有组件内有一个对象obj,通过点击按钮使得obj对象中的某些属性值进行修改并且页面重新渲染。
App.vue
<template>

  <h1>reactive使用,{{user.name}}----{{user.age}}</h1>

  <h1>{{user.hobby}}--------{{user.score.chinese}}----{{user.score.math}}</h1>

  <button @click="update">点击</button>

</template>

<script lang="ts">

import { defineComponent, reactive } from 'vue';

export default defineComponent({

  name: 'App',

  setup(){

    //返回的是Proxy代理对象,被代理者就是reactive传入的对象

    let obj= {

      name:'lx',

      age:18,

      score:{

        chinese:99,

        math:98

      },

      hobby:['pingpang','yumao']

    }

    let user = reactive(obj)

    console.log('user reactive:',user)

    function update(){

      user.name += ' xinxin'

      user.score.math = 100

      user.hobby[0] = 'tiaocheng'

      user.hobby.push('run')

      //obj.name = 'hello' 直接使用目标对象来更新属性值不能够使数据改变

      //obj.sex = '女'//添加这个属性,页面未重新渲染

      //user.sex = '女'添加了这个属性,页面也重新渲染

      //delete obj.name 删除属性,页面未重新渲染

      //delete user.name 删除了属性,页面重新渲染

    }

    return{

      user,

      update

    }

  }

});

</script>
通过对目标对象属性的添加和删除可以发现,目标对象确实删除(添加)了属性,但是界面并未重新渲染。如果操作代理对象,目标对象中的数据也会随之修改,界面也会重新渲染。
2.3 ref与reactive比较
ref 可以用来处理基本类型数据, reactive 可以用来处理对象(递归深度响应式)。
如果用 ref 对象或数组, 内部会自动将对象或数组转换为 reactive 的代理对象。
ref 内部: 通过给 value 属性添加 getter/setter 来实现对数据的劫持。
reactive 内部: 通过使用 Proxy 来实现对对象内部所有数据的劫持, 并通过 Reflect 操作对象内部数据。
App.vue
<template>

  <h2>ref与reactive</h2>

  <p>m1: {{ m1 }}</p>

  <p>m2: {{ m2 }}</p>

  <p>m3: {{ m3 }}</p>

  <button @click="update">更新</button>

</template>

<script lang="ts">

import { reactive, ref } from 'vue'

export default {

  setup() {

    const m1 = ref('lx')

    const m2 = reactive({ name: 1, child: { name: 'xxx' } })

    // 使用ref处理对象

    const m3 = ref({ name: 2, child: { name: 'llxx' } })

    console.log('m1',m1)

    console.log('m2',m2)

    console.log('m3',m3)

    console.log('m3.value.child:',m3.value.child) // 也是一个proxy对象

    const update=()=> {

      m1.value += '--'

      m2.name += 1

      m2.child.name += '++'

      m3.value = { name: 3, child: { name: 'lll' } }

      m3.value.child.name += '=='

      console.log(m3.value.child)

    }

    return {
      m1,
      m2,
      m3,
      update
    }

  }

}

</script>
ref 比 reactive 更全能,因为reactive能做的事情,ref 都能做,因为 ref 的 value 可以是Proxy。只是使用ref时需要用到.value,变量多了就比较麻烦,有点别扭。
2.4 toRefs
可以把一个响应式对象转换成普通对象,该普通对象的每个 property 都是一个 ref。
假设在界面需要渲染一个对象的name值和age值,点击按钮可以修改对象的值,可以使用reactive。
APP.vue
<template>

  <h1>App组件</h1>

  <h3>姓名:{{person.name}}</h3>

  <h3>年龄:{{person.age}}</h3>

  <button @click="update">更新</button>

</template>

<script lang="ts">

import { defineComponent, reactive } from "@vue/runtime-core";

export default defineComponent({

  setup(){

    let person = reactive({

      name: 'liaoxin',

      age: 18

    })

    const update = ()=>{

      person.name += '~'

    }

    return {

      person,

      update

    }

  }

})

</script>
如果有一个需求,需要将对象进行结构,并且修改属性值界面会重新渲染。我们不妨试一下直接将对象解构,可以发现,界面不会发生渲染,数据失去了响应性,reactive 对象取出的所有属性值都是非响应式的,那么该如何解决呢?
<template>

  <h1>App组件</h1>

  <h3>姓名:{{name}}</h3>

  <h3>年龄:{{age}}</h3>

  <button @click="update">更新</button>

</template>

<script lang="ts">

import { defineComponent, reactive } from "@vue/runtime-core";

export default defineComponent({

  setup(){

    let person = reactive({

      name: 'liaoxin',

      age: 18

    })

    let {name,age} = person

    const update = ()=>{

        name += '~'

    }

    return {

      name,

      age,

      update

    }

  }

})

</script>利用 toRefs 可以将一个响应式 reactive 对象的所有原始属性转换为响应式的 ref 属性。
App.vue
<template>

  <h1>App组件</h1>

  <h3>姓名:{{name}}</h3>

  <h3>年龄:{{age}}</h3>

  <button @click="update">更新</button>

</template>

<script lang="ts">

import { defineComponent, reactive, toRefs } from "@vue/runtime-core";

export default defineComponent({

  setup(){

    let person = reactive({

      name: 'liaoxin',

      age: 18

    })

    let {name,age} = toRefs(person)

    console.log('name',name)

    console.log('age',age)

    const update = ()=>{

        name.value += '~'

    }

    return {

      name,

      age,

      update

    }

  }

})

</script>
试着打印一下name,age可以发现,对象的每个 property 都是指向原始对象相应 property 的 ref。
2.5 toRef
为源响应式对象上的某个属性创建一个 ref 对象, 二者内部操作的是同一个数据值, 更新时二者是同步的。
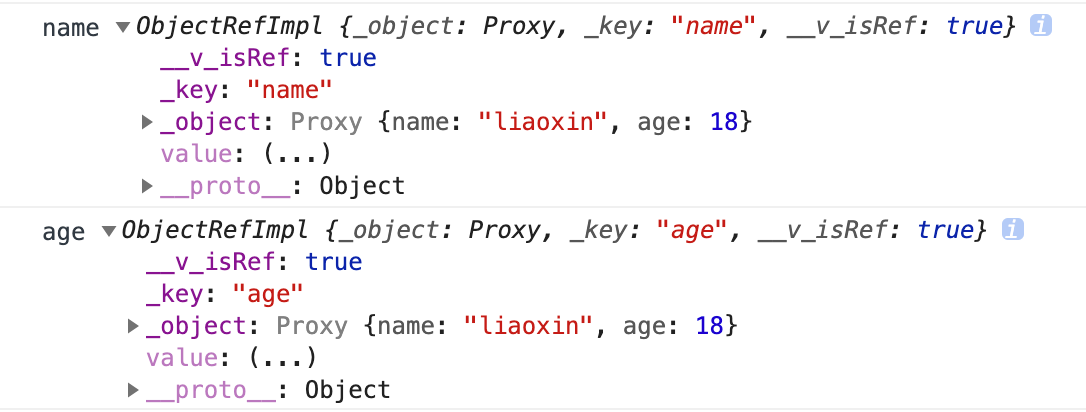
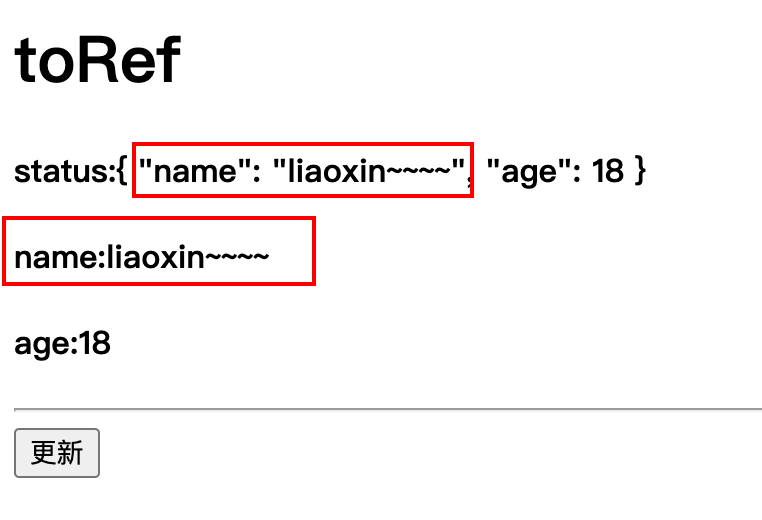
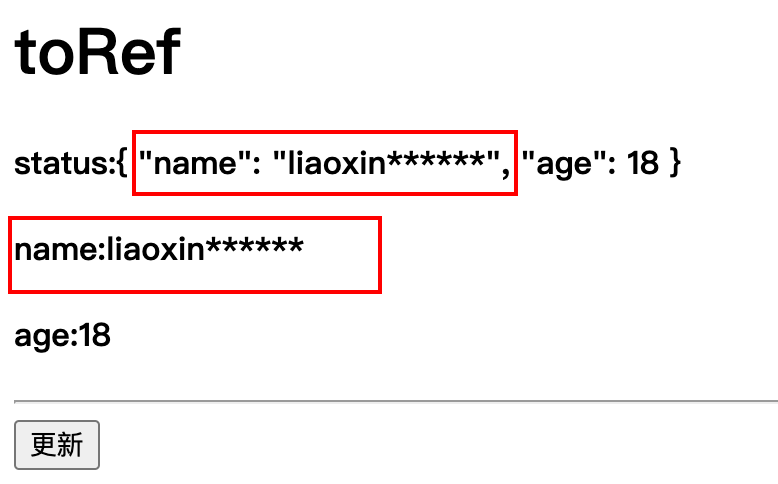
假设界面有一个status对象包含name,age属性,有name,age变量,通过点击按钮更新数据,查看页面数据的变化。status使用reactive进行响应式应用,name变量通过使用status对象中的name属性使用toRef进行响应式应用,age变量通过ref使用status中的age属性进行初始赋值。
App.vue
<template>

  <h1>toRef</h1>

  <h4>status:{{status}}</h4>

  <h4>name:{{name}}</h4>

  <h4>age:{{age}}</h4>

  <hr />

  <button @click="update">更新</button>

</template>

<script lang="ts">

import { defineComponent, reactive, ref, toRef } from "@vue/runtime-core";

export default defineComponent({

  setup(){

    let status = reactive({

      name:'liaoxin',

      age: 18

    })

    let name = toRef(status,'name')

    let age = ref(status.age)

    console.log('status',status)

    console.log('name',name)

    console.log('age',age)

    const update = ()=>{

      //更新数据

      status.name += '~~'

      //name.value += '***'

      //age.value = 19

    }

    return {
      status,
      name,
      age,
      update
    }

  }

})

</script>
首先我们将status对象中的name属性值进行修改,查看执行的界面效果。
const update = ()=>{

      //更新数据

      status.name += '~~'

    }
会发现name变量的值也一起被修改了。
接着我们将变量name的值进行修改,查看执行的界面效果。
const update = ()=>{

      //更新数据

      name.value += '***'

}
会发现status对象中的name属性值也被修改了。
最后我们将变量age的值进行修改,查看执行的界面效果。
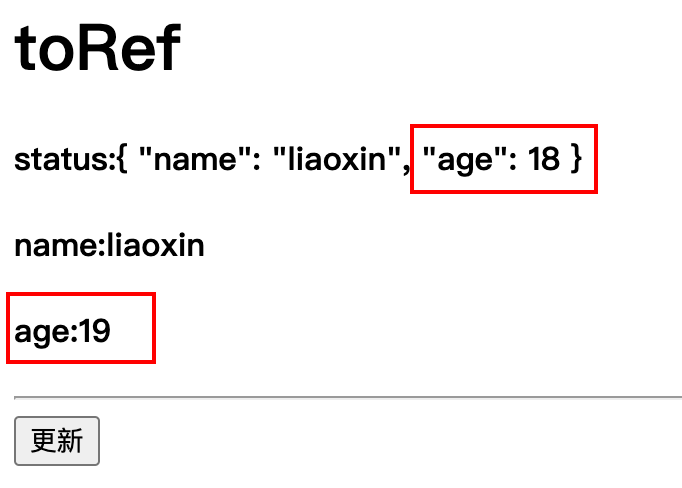
会发现只有age变量值被修改了,status对象中的age属性值并未修改。
我们可以打印一下上述name,age变量的响应式类型,可以发现两者皆是ref。

通过上述结果,可以得出:ref拷贝了一份新的数据值单独操作, 更新时相互不影响。
2.6 shallowRef
创建一个跟踪自身 .value 变化的 ref,但不会使其值也变成响应式的。
假设将界面的m1,m2响应式应用进行修改,查看页面数据是否重新渲染,分别使用ref和shallowRef进行响应式数据的应用。
App.vue
<template>

  <h1>shallowRef</h1>

  <hr/>

  <h4>ref的m1:{{m1}}</h4>

  <h4>shallowRef的m2:{{m2}}</h4>

  <hr />

  <button @click="update">更新</button>

</template>

<script lang="ts">

import { defineComponent, onMounted, ref, shallowRef } from "@vue/runtime-core";

export default defineComponent({

  setup(){

    let m1 = ref({

      name:'liao',

      friend:{

        name:'xin',

        age:18

      }

    })

    let m2 = shallowRef({

      name:'liao',

      friend:{

        name:'xin',

        age:18

      }

    })

    console.log('m1',m1)

    console.log('m2',m2)

    const update = ()=>{

      //修改ref的m1的数据

      //m1.value.friend.name += '~~'

      //修改shallowRef的m2的数据

      m2.value.friend.name += '~~'

      console.log('update')

    }

    return {
      m1,
      m2,
      update
    }

  }

})

</script>
可以发现,修改使用shallowRef定义响应式数据的m2页面并没有重新渲染。通过打印m1,m2变量,可以发现两者的不同。

只处理了.value的响应式,不对其对象进行reactive的处理。
2.7 shallowReactive
创建一个响应式代理,它跟踪其自身 property 的响应性,但不执行嵌套对象的深层响应式转换 (暴露原始值)。
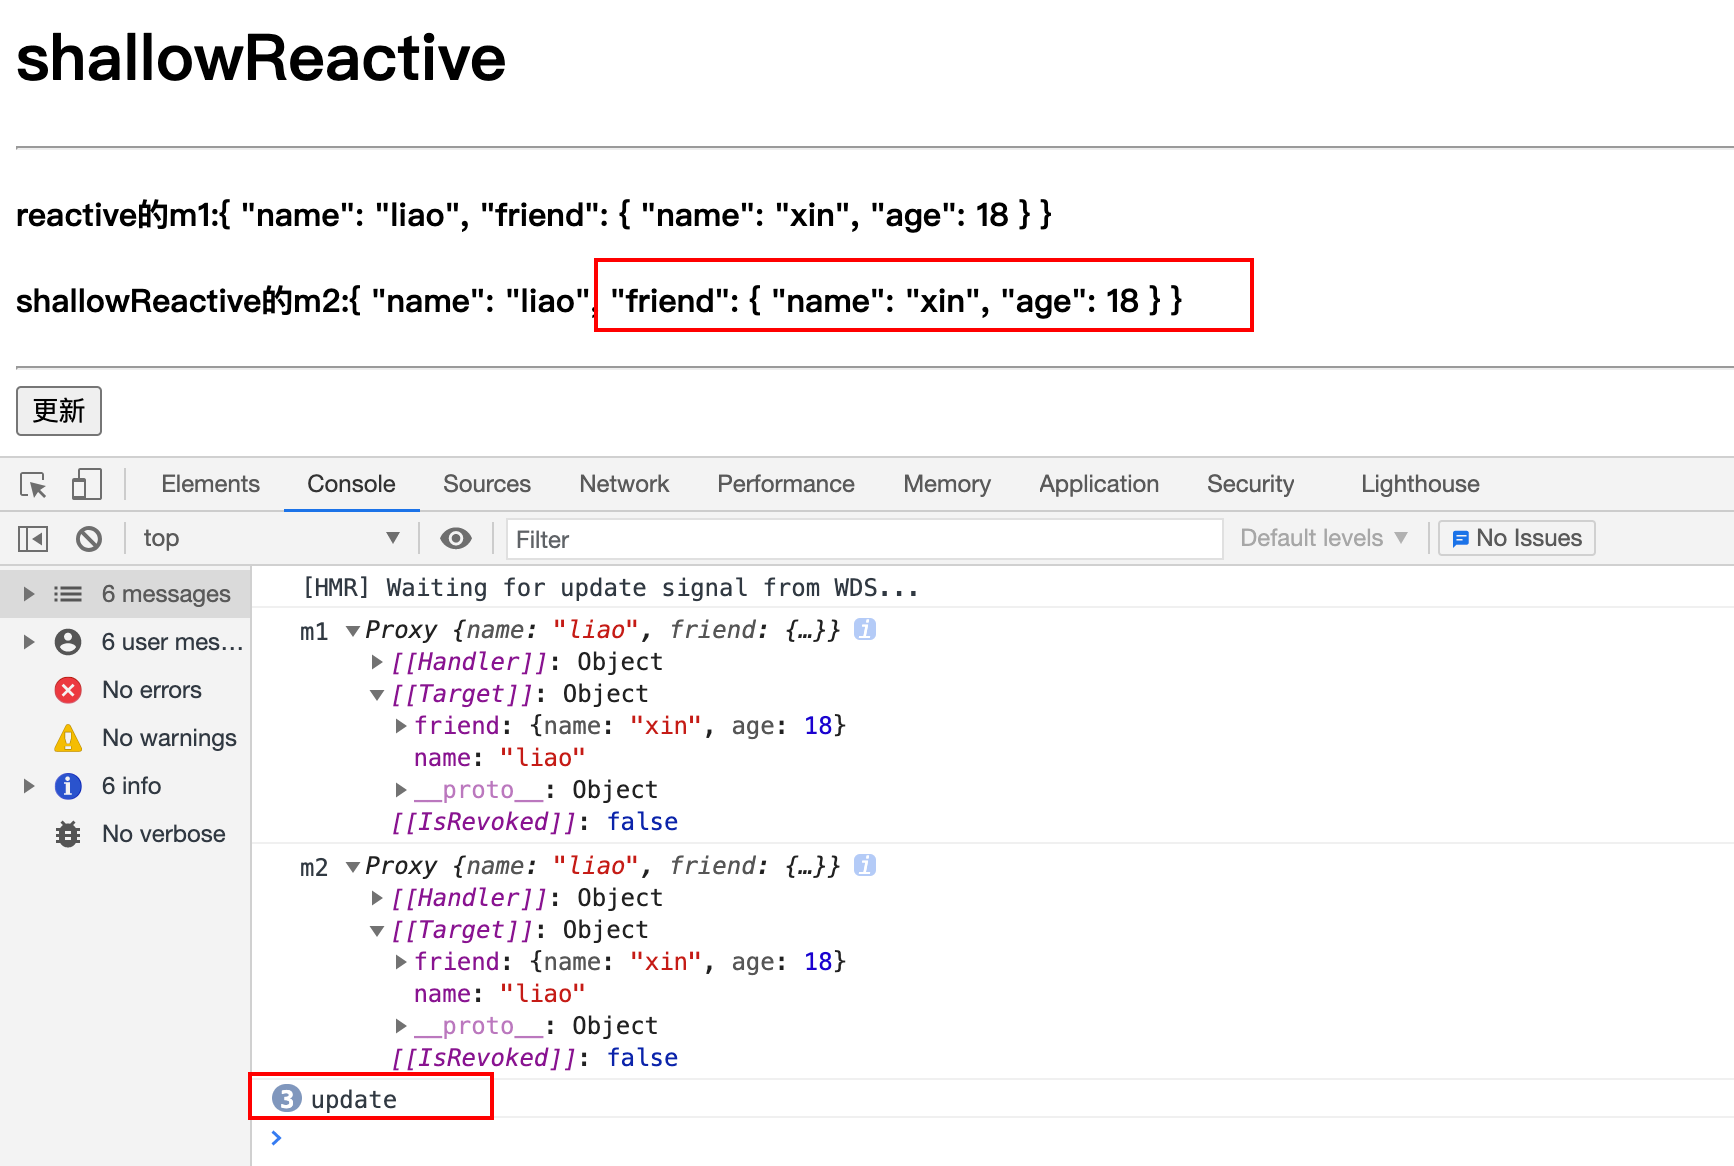
假设将界面的m1,m2响应式应用进行修改,查看页面数据是否重新渲染,分别使用reactive和shallowReactive进行响应式数据的应用。
App.vue
<template>

  <h1>shallowReactive</h1>

  <hr/>

  <h4>reactive的m1:{{m1}}</h4>

  <h4> shallowReactive的m2:{{m2}}</h4>

  <hr />

  <button @click="update">更新</button>

</template>

<script lang="ts">

import { defineComponent, reactive, shallowReactive } from "@vue/runtime-core";

export default defineComponent({

  setup(){

    let m1 = reactive({

      name:'liao',

      friend:{

        name:'xin',

        age:18

      }

    })

    let m2 = shallowReactive({

      name:'liao',

      friend:{

        name:'xin',

        age:18

      }

    })

    console.log('m1',m1)

    console.log('m2',m2)

    const update = ()=>{

      //修改ref的m1的数据

      //m1.friend.name += '~~'

      //修改shallowRef的m2的数据

      m2.friend.name += '~~'

      console.log('update')

    }

    return {
      m1,
      m2,
      update
    }

  }

})

</script>
可以发现,修改使用shallowReactive定义响应式数据的m2页面并没有重新渲染。
2.8 readonly
获取一个对象 (响应式或纯对象) 或 ref 并返回原始代理的只读代理。
只读代理是深层的:访问的任何嵌套 property 也是只读的。
应用:在某些特定情况下, 我们可能不希望对数据进行更新的操作, 那就可以包装生成一个只读代理对象来读取数据, 而不能修改或删除。
App.vue
<template>

  <h1>readonly</h1>

  <h4>status:{{status}}</h4>

  <hr />

  <button @click="update">更新</button>

</template>

<script lang="ts">

import { defineComponent, reactive, readonly } from "@vue/runtime-core";

export default defineComponent({

  setup(){

    let m1 = reactive({

      name:'liao',

      friend:{

        name:'xin',

        age:18

      }

    })

    const status = readonly(m1)

    const update = ()=>{

        status.name += '~~' // 报错

        status.friend.name += '~~' // 报错

    }

    return {

      status,

      update

    }

  }

})
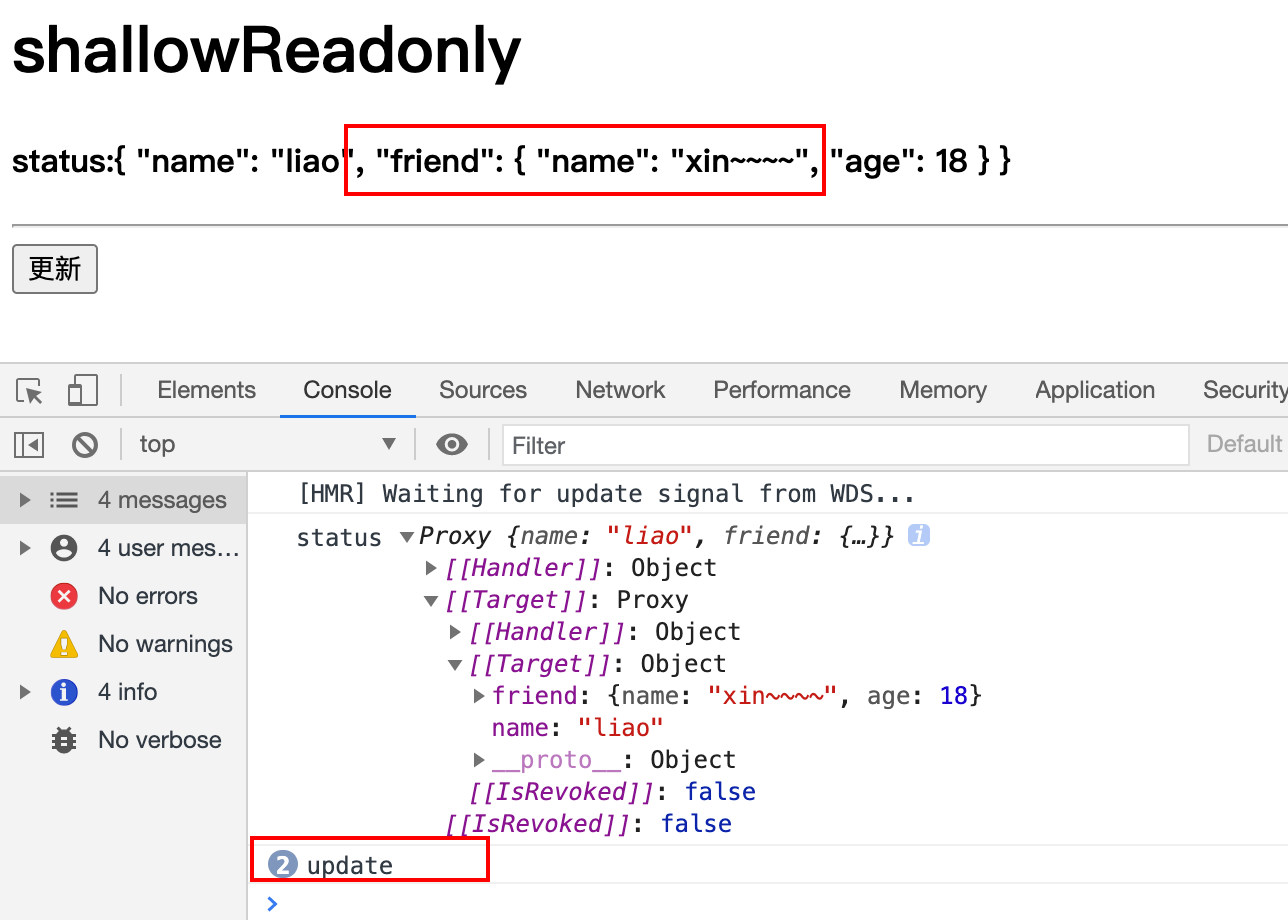
</script>创建一个 proxy,使其自身的 property 为只读,但不执行嵌套对象的深度只读转换 (暴露原始值)。
应用:在某些特定情况下, 我们可能不希望对数据进行更新的操作, 那就可以包装生成一个只读代理对象来读取数据, 而不能修改或删除。
App.vue
<template>

  <h1>shallowReadonly</h1>

  <h4>status:{{status}}</h4>

  <hr />

  <button @click="update">更新</button>

</template>

<script lang="ts">

import { defineComponent, reactive, shallowReadonly } from "@vue/runtime-core";

export default defineComponent({

  setup(){

    let m1 = reactive({

      name:'liao',

      friend:{

        name:'xin',

        age:18

      }

    })

    const status = shallowReadonly(m1)

    console.log('status',status)

    const update = ()=>{

        //status.name += '~~' // 报错

        status.friend.name += '~~'

        console.log('update')

    }

    return {

      status,

      update

    }

  }

})

</script>
通过打印status,可以发现他的类型创建了一个proxy,使其自身的 property 为只读。
2.9 响应式数据的判断API
isRef: 检查一个值是否为一个 ref 对象
isReactive: 检查一个对象是否是由 reactive 创建的响应式代理
isReadonly: 检查一个对象是否是由 readonlt 创建的只读代理
isProxy: 检查一个对象是否是由 reactive 或者 readonly 方法创建的代理
<h1>响应式数据的判断API</h1>
3 Composition API 与Option API
4 手写实现组合API
暂不实现界面更新操作,只实现数据劫持操作。
4.1 shallowReactive
浅响应式,创建一个响应式代理,它跟踪其自身 property 的响应性,但不执行嵌套对象的深层响应式转换。
index.js
const reactiveHandler = {

    //获取属性值

    get(target, key) {

    if (key === '_is_reactive') return true

    console.log('拦截读取数据',key)

      return Reflect.get(target, key)

    },

    //修改属性值

    set(target, key, value) {

      const result = Reflect.set(target, key, value)

      console.log('拦截修改数据',key,value)

      return result

    },

    //删除属性值

    deleteProperty(target, key) {

      const result = Reflect.deleteProperty(target, key)

      console.log('拦截删除数据',key)

      return result

    }

  }

  /*

  定义shallowReactive函数

  */

  function shallowReactive(target) {

      //判断当前目标对象类型是不是object

    if (target && typeof target === 'object') {

        return new Proxy(target, reactiveHandler)

    }

    return target

  }
index.html
<!DOCTYPE html>
<html lang="en">
<head>
<meta charset="UTF-8">
<meta http-equiv="X-UA-Compatible" content="IE=edge">
<meta name="viewport" content="width=device-width, initial-scale=1.0">
<title>Document</title>
<script src="./index.js"></script>
</head>
<body>
<script>
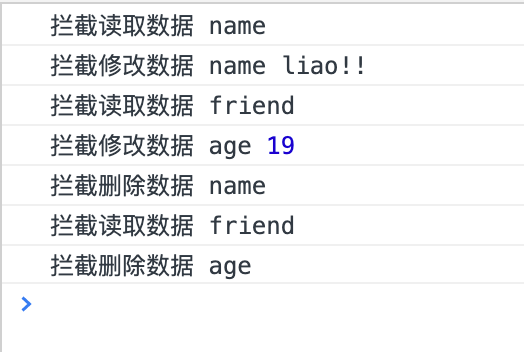
let shallowReactiveObj = shallowReactive({
name:'liao',
friend:{
name:'xin',
age:18
}
})
//拦截到了读和写数据
shallowReactiveObj.name += '**'
//拦截到了读数据
shallowReactiveObj.friend.name += '~~'
//拦截到了删除数据
delete shallowReactiveObj.name
//只拦截到了读取数据
delete shallowReactiveObj.friend.age
</script>
</body>
</html>执行结果如下图:

4.2 reactive
index.js
const reactiveHandler = {

    //获取属性值

    get(target, key) {

    if (key === '_is_reactive') return true

    console.log('拦截读取数据',key)

      return Reflect.get(target, key)

    },

    //修改属性值

    set(target, key, value) {

      const result = Reflect.set(target, key, value)

      console.log('拦截修改数据',key,value)

      return result

    },

    //删除属性值

    deleteProperty(target, key) {

      const result = Reflect.deleteProperty(target, key)

      console.log('拦截删除数据',key)

      return result

    }

  }


/*

  定义reactive函数

  */

  function reactive(target) {

    //判断当前目标对象类型是不是object

    if (target && typeof target === 'object') {

        //对数组或是对象中的所有数据进行reactive的递归处理

      if (target instanceof Array) {

        // 如果是数组

        target.forEach((item, index) => {

          target[index] = reactive(item)

        })

      } else {

        // 如果是对象

        Object.keys(target).forEach(key => {

          target[key] = reactive(target[key])

        })

      }

      return new Proxy(target, reactiveHandler)

    }

    return target

  }
index.html
<!DOCTYPE html>

<html lang="en">

<head>

    <meta charset="UTF-8">

    <meta http-equiv="X-UA-Compatible" content="IE=edge">

    <meta name="viewport" content="width=device-width, initial-scale=1.0">

    <title>Document</title>

    <script src="./index.js"></script>

</head>

<body>

    <script>

        let reactiveObj = reactive({

            name:'liao',

            friend:{

                name:'xin',

                age:18

            }

        })

        //拦截读和写数据

        reactiveObj.name +='!!'

        //拦截读和写操作

        reactiveObj.friend.age = 19

        //拦截删除操作

        delete reactiveObj.name

        //拦截读和删除操作

        delete reactiveObj.friend.age

    </script>

</body>

</html>
执行结果如下图:
4.3 ref
index.js
/*
定义ref函数
*/
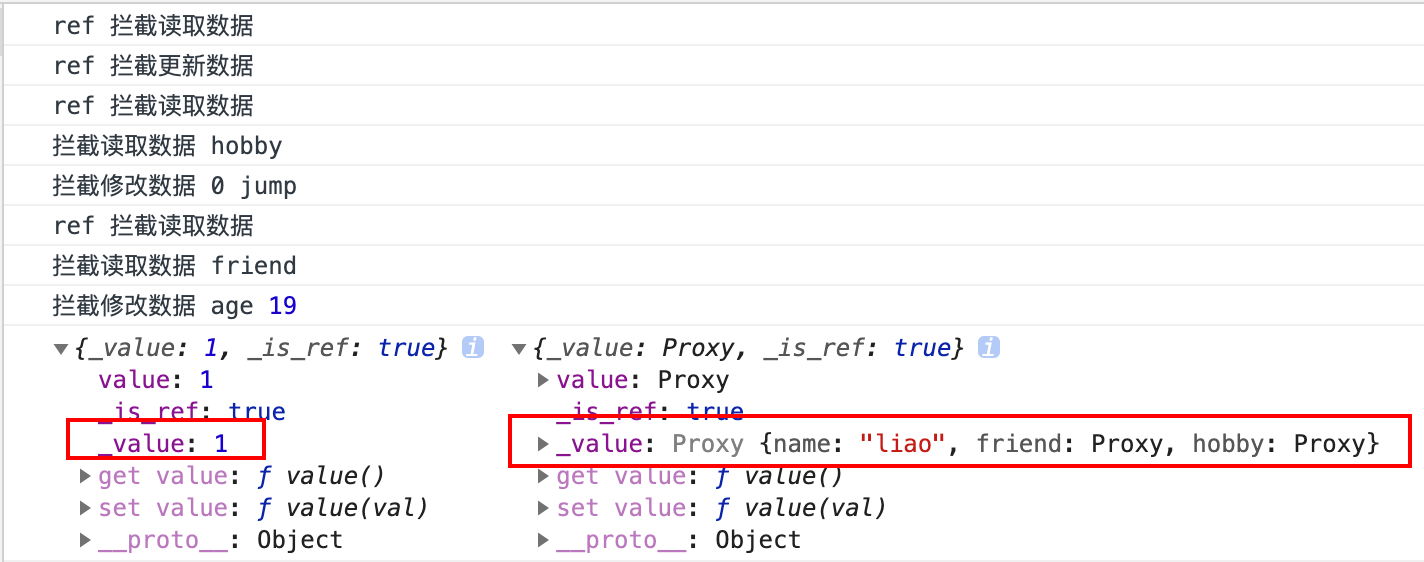
function ref(target) {
// 因为如果用 ref 对象或数组, 内部会自动将对象或数组转换为 reactive 的代理对象。
if (target && typeof target === 'object') {
target = reactive(target)
}
const result = {
_value: target, // 用来保存数据的内部属性
_is_ref: true, // 用来标识是ref对象
get value() {
console.log('ref 拦截读取数据')
return this._value
}, //通过.value形式访问或修改数据
set value(val) {
this._value = val
console.log('ref 拦截更新数据')
}
}
return result
}测试数据采用基本数据类型和对象类型进行测试。
index.html
<!DOCTYPE html>

<html lang="en">

<head>

    <meta charset="UTF-8">

    <meta http-equiv="X-UA-Compatible" content="IE=edge">

    <meta name="viewport" content="width=device-width, initial-scale=1.0">

    <title>Document</title>

    <script src="./index.js"></script>

</head>

<body>

    <script>

        let ref1 = ref(0)

        let ref2 = ref({

            name:'liao',

            friend:{

                age:18

            },

            hobby:['run','play']

        })

        ref1.value++

        ref2.value.hobby[0] = 'jump'

        ref2.value.friend.age = 19

        console.log(ref1,ref2)

    </script>

</body>

</html>
执行结果如下图,可以直接观察看两个变量的响应式应用的区别。
4.4 shallowRef
index.js
/*

定义shallowRef函数

*/

function shallowRef(target) {

  const result = {

    _value: target, // 用来保存数据的内部属性

    _is_ref: true, // 用来标识是ref对象

    get value() {

      console.log('shallowRef 拦截读取数据')

      return this._value

    },                //通过.value形式访问或修改数据

    set value(val) {

      this._value = val

      console.log('shallowRef 拦截更新数据')

    }

  }


  return result

}
index.html
<!DOCTYPE html>
<html lang="en">
<head>
<meta charset="UTF-8">
<meta http-equiv="X-UA-Compatible" content="IE=edge">
<meta name="viewport" content="width=device-width, initial-scale=1.0">
<title>Document</title>
<script src="./index.js"></script>
</head>
<body>
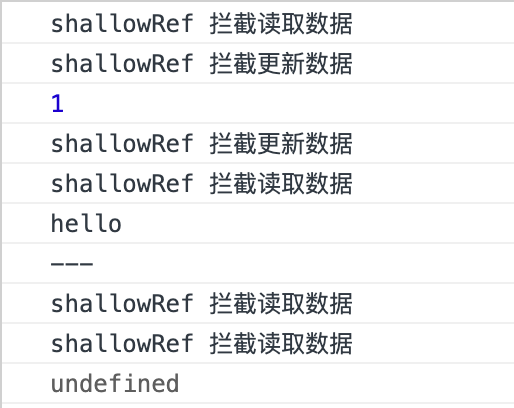
<script>
let shallow1 = shallowRef(0)
let shallow2 = shallowRef({
name:'liao',
friend:{
name:'xin',
age:18
}
})
//拦截读取和写操作
console.log(++shallow1.value)
//拦截读取和写操作
shallow2.value = 'hello'
console.log(shallow2.value)
console.log('---')
//拦截读取操作
shallow2.value.friend = '**'
console.log(shallow2.value.friend)
</script>
</body>
</html>执行结果如下图:
4.5 readonly
index.js
const readonlyHandler = {
get(target, key) {
if (key === '_is_readonly') return true
console.log('拦截读取数据')
return Reflect.get(target, key)
},
set() {
console.warn('拦截只读数据, 不能修改')
return true
},
deleteProperty() {
console.warn('拦截只读数据, 不能删除')
return true
}
}
/*
定义readonly函数
*/
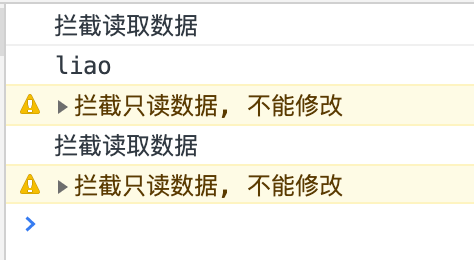
function readonly(target) {
if (target && typeof target === 'object') {
if (target instanceof Array) {
// 数组
target.forEach((item, index) => {
target[index] = readonly(item)
})
} else {
// 对象
Object.keys(target).forEach(key => {
target[key] = readonly(target[key])
})
}
return new Proxy(target, readonlyHandler)
}
return target
}index.html
<!DOCTYPE html>

<html lang="en">

<head>

    <meta charset="UTF-8">

    <meta http-equiv="X-UA-Compatible" content="IE=edge">

    <meta name="viewport" content="width=device-width, initial-scale=1.0">

    <title>Document</title>

    <script src="./index.js"></script>

</head>

<body>

    <script>

        let readonly1 = readonly({

            name:'liao',

            hobby:['run','jump']

        })

        console.log(readonly1.name)

        readonly1.name = 'xin'

        readonly1.hobby[0] = 'play'

    </script>

</body>

</html>
执行结果如下图:
4.6 shallowReadonly
index.js
const readonlyHandler = {

  get(target, key) {

    if (key === '_is_readonly') return true

    console.log('拦截读取数据')

    return Reflect.get(target, key)

  },

  set() {

    console.warn('拦截只读数据, 不能修改')

    return true

  },

  deleteProperty() {

    console.warn('拦截只读数据, 不能删除')

    return true

  }

}


/*

定义shallowReadonly函数

*/

function shallowReadonly(target) {

  if (target && typeof target === 'object') {

    return new Proxy(target, readonlyHandler)

  }

  return target

}
index.html
<!DOCTYPE html>

<html lang="en">

<head>

    <meta charset="UTF-8">

    <meta http-equiv="X-UA-Compatible" content="IE=edge">

    <meta name="viewport" content="width=device-width, initial-scale=1.0">

    <title>Document</title>

    <script src="./index.js"></script>

</head>

<body>

    <script>

        let shallow1 = shallowReadonly({

            name:'liao',

            hobby:['run','jump']

        })

        console.log(shallow1.name) //拦截读取数据

        shallow1.name = 'xin' //拦截读取数据,不能修改数据

        shallow1.hobby[0] = 'play' //拦截读取数据,并没有说不能修改数据

    </script>

</body>

</html>
执行结果如下图:
5 组件
5.1 Fragment
在 Vue2 中: 组件必须有一个根标签。
在 Vue3 中: 组件可以没有根标签, 内部会将多个标签包含在一个 Fragment 虚拟元素中。
优点: 减少标签层级, 减小内存占用。
5.2 Teleport
5.3 Suspense
它们允许我们的应用程序在等待异步组件时渲染一些后备内容,可以提高用户体验。
当AsyncComp组件还未加载时,就会显示LOADING组件。
App.vue
<template>

  <Suspense>

    <template v-slot:default>

      <AsyncComp />

    </template>

    <template v-slot:fallback>

      <h1>LOADING...</h1>

    </template>

  </Suspense>

</template>

<script lang="ts">

import { defineAsyncComponent } from 'vue'

const AsyncComp = defineAsyncComponent(() => import('./AsyncComp.vue'))

export default {

  setup() {

    return {}

  },
  components: {

    AsyncComp,

  }
}

</script>- 本文作者: étoile
- 版权声明: 本作品采用 知识共享署名-非商业性使用-相同方式共享 4.0 国际许可协议 进行许可。转载请注明出处!